

Ahhhhh. This week has been one of those weeks (and it's only Thursday!) You know what I mean by "one of those weeks", don't you? I mean one of those weeks where... one day you don't even leave your bedroom until 1PM. One day you have 4 meltdowns before dinnertime. Your to-do list continually grows, but nothing really gets taken off. One of those weeks where you just don't believe that you can do it. "It," being everything from doing the laundry to being patient to finding time
for your projects to chasing that dream of yours.Yep. One of those weeks.
I've found that each and every day is a battle to believe that you can do it (insert all your menial tasks, your daily to-dos, and your big dreams, too). Some days all we can do is take a step back and resolve for a better tomorrow. And when that tomorrow comes, we have to try all over again.
In the midst of my "one of those weeks," I found myself struggling to create. Struggling to design... to reinvent... to create. What's the sewing equivalent of writer's block? Well, that's where I found myself. Haha.
The cures for this creator's block were three-fold: 1. Sunshine. 2. A good night's sleep (thanks to my husband who took baby so I could rest!) 3. Some "me" time to go back to the basics.
So, this project is what I came up with. Going back to the basics, and adding a touch of me. :) It's simple. Straightforward. But just these little basic tee makeovers helped me feel ready to design, create, and stretch myself again. We'll see what's next! :) xoxo
________________________________________________________________________________
I love basics.
I'm all about throwing on jeans + a tee for my everyday uniform. It's easy and quick and something I don't have to think about forever when I'm getting ready in the morning. Don't get me wrong -- I love getting dressed up... skirts, summer dresses.... but for the everyday mom-(trying to be)on-the-go, jeans and a tee are where it's at.
So, when I find tees that are just a step above "basic," I'm thrilled! Give me all of those fun trims, tweaked sleeves, and details at the neckline! They add just a little "oomph" to a simple t-shirt and keep your basics interesting.
Today, I'm sharing with you 4 easy ways to makeover your basic tee and spruce it up a bit! These tweaks are all super easy. Each one could be done in under 20 minutes. And all of the tees I modified were under $5 each. :)
Keep reading to find out more about each option! :)


Okay! For the first tee, I did 2 things -- I added panels down the side to give it extra volume, and I added black ribbon ties at the neck for a bow. In order to have extra fabric to add panels at the sides, I bought 2 of these charcoal v-necks.
I love this dressed up tee because... well, it feels a little more dressed up! I could get away wearing this for a casual date night -- with skinny jeans and heeled sandals, or I could throw it on with a pencil skirt to dress it up even more. The bow at the neck is so simple! But somehow makes you look like you put in a lot more effort. :)
Here's how to do it:

1. Cut along the entire side seam and bottom sleeve seam (on both sides) of the shirt you are going to refashion.

2. Cut a panel along the same area (side seam + sleeve seam) on your second tshirt, on both sides.
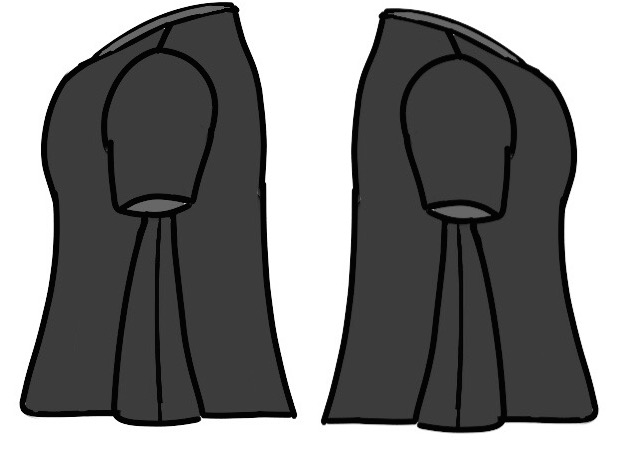

Viola!

For the second tshirt redo, I picked out a pretty trim with a boho-feel and added some ruching to the sleeves. This one is way easy! I like to wear this one for super casual days... just with jeans and sandals and a fun hairdo-- a braid or a twist or a messy half-bun. :)


2. Lay trim face down on the right side of your shirt, lined up with where you cut off the bottom. Sew.


5. Put the needle down through the sleeve one final time and pull to create the ruche. Tie off with a knot to stabilize the ruching.

Third tee! For this one, I took 1 tshirt + about a yard of eyelet ruffle trim. This totally incorporates the peplum trend and the eyelet trend.
This was the first tshirt makeover that I did... you can read more about it & find the tutorial here! :)

Kay. This one is my fav. I've been loving all of the criss cross neck and lace-up neck trends lately. They're so simple, but add so much detail and interest to pieces. A little bit of edginess, too.
Safe to say I'll be picking up tees in a few more colors to do this to. :)
All you need for this is 1 tee + some simple trim in a matching color.

1. Cut trim to desired length. Lay out to desired criss-cross. Sew! It's that simple. :)


Post a Comment