

Saturdays are all about family time. Big breakfasts. Morning chores. Parks and walks and hikes and seasonal activities. Movie nights and bbqing. I looooooooove Saturdays.
I won't name names... but SOMEONE kept me up all night. So I'm a little bit of a zombie this morning. But, a thankful zombie nonetheless. Thankful for the sunshine and warmth, even though it creeps into our non-air-conditioned house a little too much. Thankful for the sweet squishy baby whose face lights up when he sees me, even the grumpy 3am version of
me. Life is crazy and full and good, even through the hard times!
______
Okay! Today, I'm sharing one of my fav projects yet. Those of you who follow my insta stories may remember this pretty pink + navy + white striped fabric I grabbed while at the Fabric District with my mom a month or so ago. This is the fabric that I saw buried in a mound of fabric on the floor in a shop. Yep, a pile on the floor.
I am a sucker for stripes... especially ones with more interest, colors, size variations, etc. I loved that this one felt a little preppy - and wanted to juxtapose that with using it for a more bohemian look
And... you want to know a secret about this look? (Okay, so, you already know if you read the title).... they're separates! Not a dress! I decided to make separates that could be worn to look like a dress, but also allowed for being worn separate for more casual looks. You can see them worn separately below :)
Keep reading for the full tutorial!


And as separates...

_______________________________________________________________________________

What you'll need:
- about 2 1/2 yards of knit fabric (mine was a cotton poly blend with horizontal stretch)
- pattern pieces listed above
- snaps
Kay! First things first, you will need to cut out all of your pattern pieces! A couple notes about these pieces:
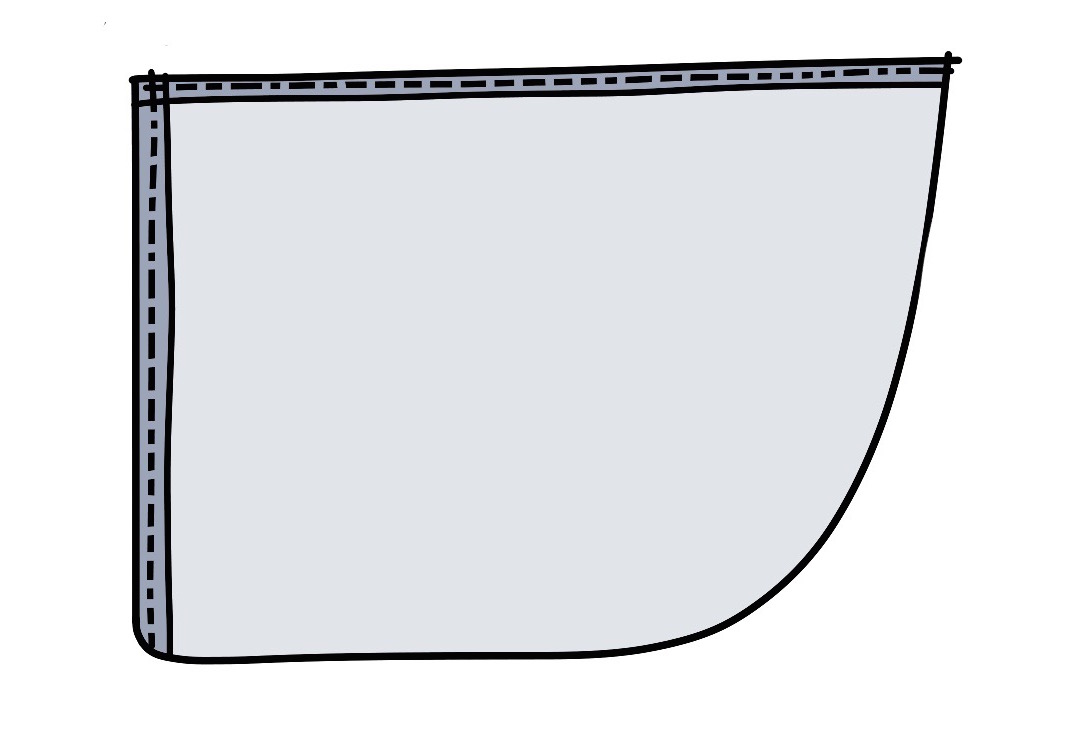
For piece #1, your skirt piece, the measurement along the top should be about 1.5x your waist measurement. And the height measurement should be your waist to ankle measurement.
For pieces #7 and #8, your sleeve ruffles, the width should be about 2x your bicep measurement.
For piece #11, your skirt ruffle, the width should be about 3x your waist measurement.
To get my pattern pieces for my top, I used a shirt from my closet that had a similar shape to what I wanted.
Cut your top pieces before your neckline lining pieces. Those lining pieces should match your actual neckline fairly well.
______
After you have your pattern pieces all cut out, you are ready to begin!
 |
Step 1.
Take your skirt piece (#1) and finish both the top length and the straight edge by folding under twice, ironing, and sewing in place.

Step 2.
Finish the edges of your skirt ruffle piece (#11). Then do a basting stitch along the whole length at the top of the piece.
*Basting stitch... set your machine to it's longest stitch length and sew. Do not do any backstitching. Cut threads long.*

Step 3.
After you have completed your basting stitch, pull on the threads to cinch the fabric and create a ruffle. Play with the fabric until ruffles are even and to your desired volume.

Step 4.
Attach skirt ruffle (#11) to skirt (#1) by matching the basted edge of the ruffle piece to the rounded edge of the skirt, all the way from waist down and around to the bottom. Match these pieces right sides together. Pin in place. Sew.

Step 5.
Unfold ruffle and iron seams flat. Wrap skirt around your body to mark where skirt overlaps and where snaps should go. In picture above, I show where I added all 8 snaps. Gray dots indicate snaps pointing outward. Black dots indicate snaps pointing backward.
END OF SKIRT. BEGIN TOP.

Step 1.
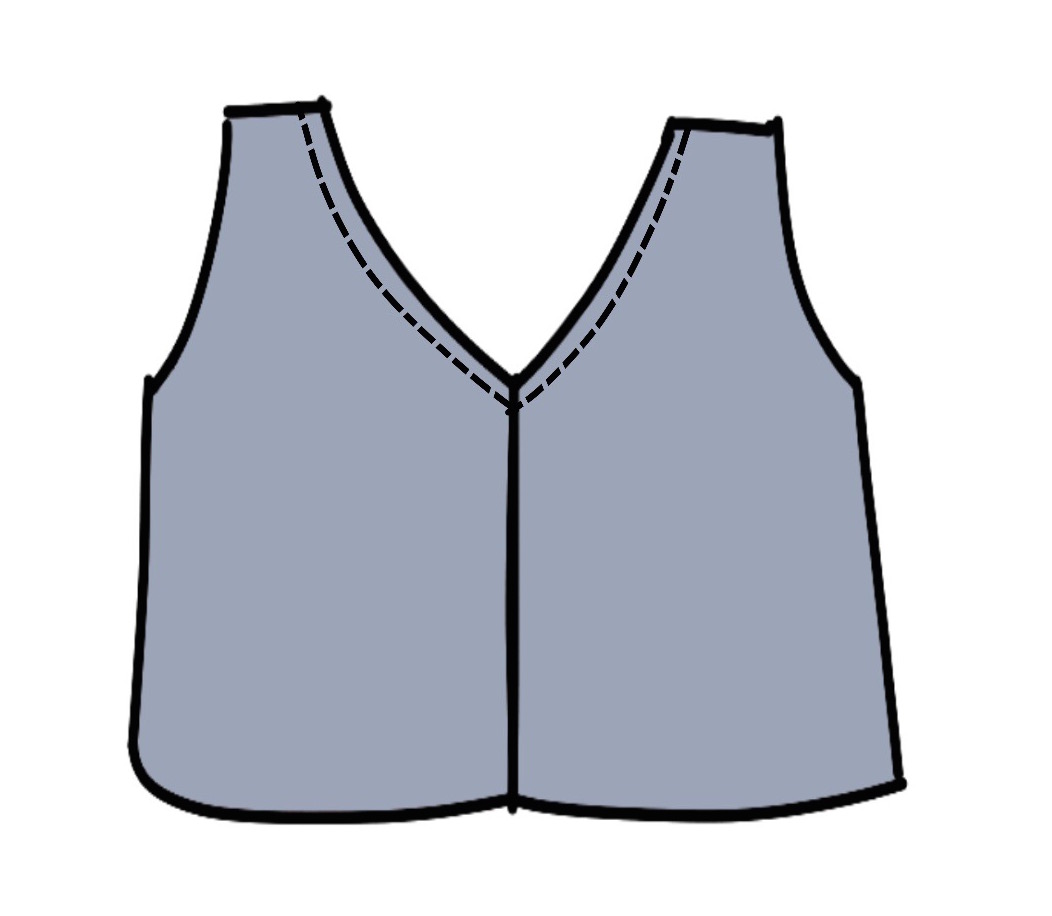
Take left front bodice (#2) and right front bodice (#3) and match on top of one another, right sides together. Pin and sew where they connect down the middle front seam. Unfold and iron seams.

Step 2.
Take front neckline lining (#9) and lay on top of new front bodice (#2 + #3), matching up with neckline. Lining should lay RIGHT SIDE UP, not right sides together. Pin and sew together carefully, about 1/4" from edge. Snip fabric edge up to but not through seam, about every 2". Fold lining over to inside of neck and press.
Step 3.
Topstitch neckline.
REPEAT STEPS 2-3 FOR BACK OF NECKLINE.

Step 4.
Match bodice front (#2 + #3) and bodice back (#4) at shoulders, right sides together. Pin in place. Sew shoulder seams.

Step 5.
Lay bodice pieces right side up on the floor, open at the shoulders. Take left sleeve (#5) and match rounded edge to shoulder point, at the seam, right sides together. Pin curved edge all the way around arm hole. Sew. Repeat with second sleeve.

Step 6.
Match bodice pieces right sides together. Line up sleeves and sides. Sew up bottom of sleeves and down side seams.

Step 7.
Finish the edges of your left sleeve ruffle piece (#7) and right sleeve ruffle piece (#8). Then do a basting stitch along the whole length at the top of the each piece.

Step 8.
After you have completed your basting stitch, pull on the threads to cinch the fabric and create a ruffle. Play with the fabric until ruffles are even and to your desired volume. Do for both pieces.

Step 9.
Take your sleeve ruffle pieces (#7 + #8) and wrap them around sleeves, with basted edge and raw sleeve edge matching, right sides together. Pin in place and sew. Unfold and iron.

Step 10.
Fold under bottom of top, iron, and hem.


Post a Comment